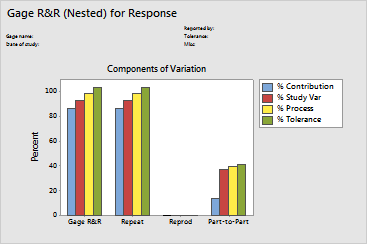
This chart is a graphical representation of the Gage R&R section
of the Session Window output.
The sources of variation that are represented in the graph are:
· Total Gage R&R,
which is the variation due to the measuring system, including multiple
operators using the same gage.
· Repeatability,
which is the variability in measurements obtained when parts from the
same batch are measured by the same operator.
· Reproducibility,
which is the variability in measurements obtained when parts are measured
by different operators.
· Part-to-Part,
which is the variability in measurements across different parts.
Separate bars represent:
· %Contribution,
which is 100 times the variance component for that source divided by the
total variance.
· %Study Variation,
which is 100 times the study variation for that source divided by the
total study variation.
· %Tolerance
(if a process tolerance is given in the Options subdialog), which is 100
times the study variation for that source divided by the process tolerance.
· %Process
(if a historical standard deviation is given in the Options subdialog),
which is 100 times the study variation for that source divided by the
process variation.
In a good measurement system, the largest component of variation is
Part-to-Part variation. If instead you have large amounts of variation
attributed to Gage R&R (Repeatability and/or Reproducibility), corrective
action is needed.
Example Output |

|

Interpretation |

|
For the temperature data, you can see that most of the variability can
be accounted for by the inaccuracy of the gage (Repeatability).
