|
|
Gage Linearity and Bias StudyGraphs - Gage Linearity |
The gage linearity table consists of the following:
![]() , which is the proportion of the variation in the average bias
that can be explained by its linear relationship with the master part measurements.
If the R
, which is the proportion of the variation in the average bias
that can be explained by its linear relationship with the master part measurements.
If the R![]() value is not close to 1, the relationship is
not linear and linearity cannot be assessed. A non-linearity problem may
exist.
value is not close to 1, the relationship is
not linear and linearity cannot be assessed. A non-linearity problem may
exist.
Example Output |

Interpretation |
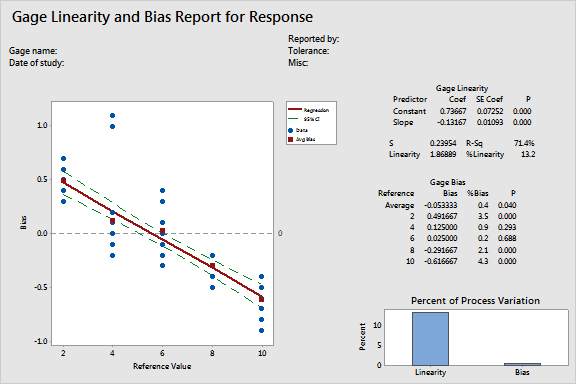
For the parts data, the %linearity is relatively large (13.2%), which indicates a problem. Smaller parts tend to measure too high, while larger parts tend to measure too low.
Because the R![]() value is high (71.4%),
you can assume that the relationship between the master part measurement
and bias is close to linear. It is reasonable to assess linearity for
the parts data.
value is high (71.4%),
you can assume that the relationship between the master part measurement
and bias is close to linear. It is reasonable to assess linearity for
the parts data.
| Minitab help | Stat | Graph | SixSigma | DOE | Glossary | Reliability | SPC,MSA,CPK | ||
|
|||||||||