main topic interpreting results session command see also
In this example, we do a gage R&R study on two data sets: one in which measurement system variation contributes little to the overall observed variation (GAGEAIAG.MTW), and one in which measurement system variation contributes a lot to the overall observed variation (GAGE2.MTW). For comparison, we analyze the data using both the X and R method (below) and the ANOVA method. You can also look at the same data plotted on a Gage Run Chart.
The GAGEAIAG data was taken from Measurement Systems Analysis Reference Manual, 3rd edition. (Chrysler, Ford, General Motors Supplier Quality Requirements Task Force). Ten parts were selected that represent the expected range of the process variation. Three operators measured the ten parts, three times per part, in a random order.
For the GAGE2 data, three parts were selected that represent the expected range of the process variation. Three operators measured the three parts, three times per part, in a random order.
Step 1: Use the X and R method with GAGEAIAG data
1 Open the worksheet GAGEAIAG.MTW.
2 Choose Stat > Quality Tools > Gage Study > Gage R&R Study (Crossed).
3 In Part numbers, enter Part.
4 In Operators, enter Operator.
5 In Measurement data, enter Measurement.
6 Under Method of Analysis, choose Xbar and R.
7 Click Options. Under Process tolerance, choose Upper spec - Lower spec and enter 8.
8 Click OK in each dialog box.
Step 2: Use the X and R method with GAGE2 data
1 Open the file GAGE2.MTW.
2 Choose Stat > Quality Tools > Gage Study > Gage R&R Study (Crossed).
3 In Part numbers, enter Part.
4 In Operators, enter Operator.
5 In Measurement data, enter Response.
6 Under Method of Analysis, choose Xbar and R.
7 Click OK.
Session window output
Gage R&R Study - XBar/R Method
%Contribution Source VarComp (of VarComp) Total Gage R&R 0.09350 7.12 Repeatability 0.04075 3.10 Reproducibility 0.05275 4.02 Part-To-Part 1.21982 92.88 Total Variation 1.31332 100.00
Process tolerance = 8
Study Var %Study Var %Tolerance Source StdDev (SD) (6 × SD) (%SV) (SV/Toler) Total Gage R&R 0.30578 1.83469 26.68 22.93 Repeatability 0.20186 1.21118 17.61 15.14 Reproducibility 0.22968 1.37810 20.04 17.23 Part-To-Part 1.10445 6.62672 96.37 82.83 Total Variation 1.14600 6.87601 100.00 85.95
Number of Distinct Categories = 5
Gage R&R for Measurement |
Gage R&R Study - XBar/R Method
%Contribution Source VarComp (of VarComp) Total Gage R&R 7244.42 78.17 Repeatability 7244.42 78.17 Reproducibility 0.00 0.00 Part-To-Part 2022.76 21.83 Total Variation 9267.19 100.00
Study Var %Study Var Source StdDev (SD) (6 × SD) (%SV) Total Gage R&R 85.1142 510.685 88.42 Repeatability 85.1142 510.685 88.42 Reproducibility 0.0000 0.000 0.00 Part-To-Part 44.9751 269.851 46.72 Total Variation 96.2662 577.597 100.00
Number of Distinct Categories = 1
Gage R&R for Response |
Graph window output


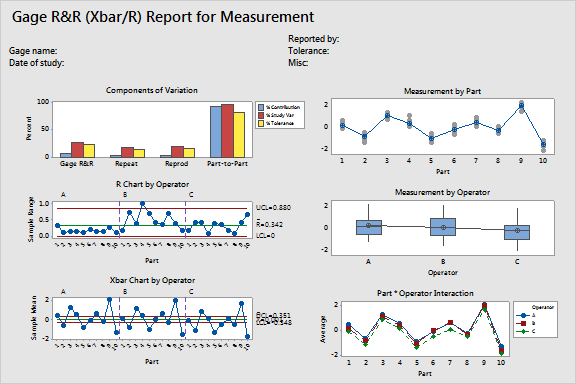
Look at the %Contribution column in the Gage R%R Table. The measurement system variation (Total Gage R&R) is slightly smaller than what was found for the same data with the ANOVA method.
The % Study Var column shows that the Total Gage R&R equals 26.70% of the study variation; again slightly smaller than what was found using the ANOVA method. In some cases, there is a greater difference in the two methods because the ANOVA method considers significant Operator by Part interactions whereas the X and R method does not. See Guidelines for measurement system acceptability.
According to the AIAG, when the number of distinct categories is 5 it represents an adequate measuring system. However, as explained above, you would be better off using the ANOVA method for this data. See Number of distinct categories statement.
In the Components of Variation graph, a low percentage of variation (7.13%) is due to the measurement system (Gage R&R), and a high percentage (92.87%) is due to differences between parts.
Most of the points in the X Chart are outside the control limits when the variation is mainly due to part-to-part differences.
Look at the %Contribution column in the Gage R&R Table. A large percentage (78.11%) of the variation in the data is due to the measuring system (Gage R&R); little is due to differences between parts (21.89%).
The % Study Var column shows that the Total Gage R&R equals 88.38% of the study variation; again slightly smaller than what was found using the ANOVA method. In
A 1 in Number of distinct categories tells you the measurement system is poor; it cannot distinguish differences between parts.
In the Components of Variation graph, a high percentage of variation (78.11%) is due to the measurement system (Gage R&R) - primarily repeatability, and the low percentage (21.89%) is due to differences between parts.
Most of the points in the X chart will be within the control limits when the observed variation is mainly due to the measurement system.